Do you want to embed Instagram Reels on your website? The process is simple. And, depending on your requirements, you might be able to do so 100% free.
In this guide, we cover two different methods for adding Instagram Reels to your site. Plus, we showcase different free software that automatically adds new Reels, so you don’t have to copy and paste HTML code every time.
Read our tutorials for each method and decide which one fits your needs. You’ll see a list of benefits to help you decide.
The two methods for embedding Instagram Reels on your website
When it comes to displaying Instagram Reels on your website, you have two main options—manual embedding and using an Instagram Reel aggregator. Each method has its pros and cons depending on your content goals, technical comfort, and how often you want your feed to update.
1. Manually embed Instagram Reels
This method involves copying the embed code directly from individual Instagram Reels and pasting it into your website. It’s a simple and completely free option, which makes it appealing for website owners who only want to showcase a few select posts.
However, it’s not the most scalable solution. If you want to keep your feed fresh with new content, you’ll need to manually repeat the process every time you publish a new Reel. Over time, that can become budonsome—and a bit of a design headache if you want consistent styling across your site.
Best for: Low-volume needs, highly curated content, and users comfortable with basic HTML.
2. Use an Instagram Reel aggregator
A more scalable and dynamic solution is to use an Instagram Reel aggregator. This is a tool that automatically pulls in and displays your latest Reels using a feed you can embed on your site.
These tools allow you to:
- Display a constantly updated feed of Reels
- Control the look and feel of your social feed (no CSS required)
- Approve content before it goes live, if desired
With the right aggregator, you can set everything up once and let your content update automatically in the background. It’s the ideal choice for anyone who posts Reels regularly or wants to keep their website content dynamic and visually engaging.
Best for: High-volume posting, automated updates, branded display, and non-technical users.
The benefits of the aggregator method
While the manual approach is a great way to embed a specific Reel in a specific spot, its reach is limited. On the other hand, the aggregator method provides many benefits to those who want to keep things fresh and up to date.
Some of the main benefits of the aggregator method to embed Instagram Reel feed on your website include:
- Automatically adds new Reels to your website – If you choose automatic approval, every new post on your account will be added to the feed on your website.
- No need to copy and paste code multiple times – Even if you choose to approve content in your social media aggregator manually, you won’t have to copy and paste the HTML code to add new posts to your site. All you have to do is click a button to approve each post and it will get added.
- Allows you to design the style of the feed with no coding required – You can choose the style and colors of your feed in your social media aggregator to make sure the social feed matches your website. You don’t have to do any custom coding with CSS.
- Free depending on your needs – Depending on your needs, you might be able to use the free plan of the software and you won’t have to pay for a monthly subscription. (Keep reading for our favorite tools.)
The 7 step process to easily embed Instagram Reels on any website
To continuously showcase your latest Instagram Reels on your website, all you need to do is follow these simple steps.
Step 1. Choose the right aggregator to embed Instagram posts
Before anything else, you need to select a social media aggregator that supports Instagram Reels. Look for a platform that offers:
- Easy integration with Instagram Reels
- Custom design options without needing code
- Moderation controls (manual and automatic)
- Responsive layouts that look good on all devices
- A free plan or affordable pricing for your traffic level
Curator is a great option that checks all these boxes. It’s beginner-friendly, works seamlessly with Instagram Reels, and offers powerful customization tools—even on the free forever plan.
Step 2. Create a new feed and choose the moderation style
The next step is to create a new feed. Give it a clear title. We’ve chosen “Instagram Reels” as the feed title. You also need to choose your moderation style.
Go for “Approved” if you want all of the posts from your Instagram account to be automatically added to your site. Choose “Needs approval” if you’d rather select which ones get added.
If you post mostly Reels, you can select “Approved” and then delete ones you don’t want showing up. But if you post Reels infrequently and only want to add Reels to your website, it’ll be easier to select “Needs approval” and then select the Reels.

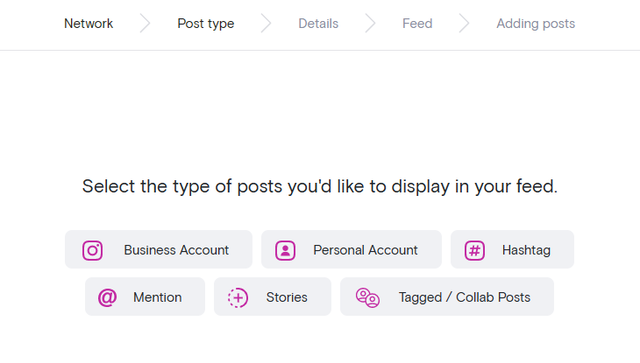
Step 3. Select the source and connect your Instagram account
Now you need to select the source of your new feed. Click the “Add a Source” button within the new feed and select Instagram as the source.
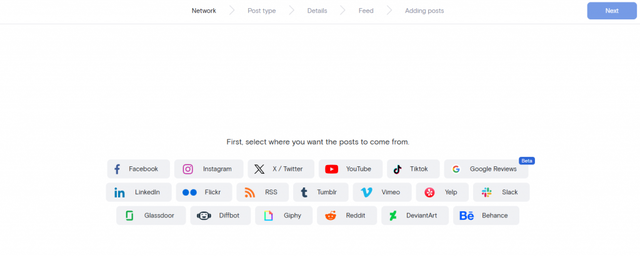
Then select the type of posts. You can pull Reels from a business account, personal account, hashtag, or account mentions.
When aggregating Instagram Reels from a hashtag, make sure to use manual approval. We strongly recommend watching every Reel made by an outside creator before deciding if it’s appropriate enough to add to your website.
Step 4. Approve the Reels
Next, approve the content you want on your website. You can improve all of your Reels or just your favorite ones.

If you’ve chosen automated approval, this step is just reversed. Delete any Reels you don’t want showing up.
Step 5. Design your feed
Once you have identified the Reels to display (or remove), you will transition to the best part of this process—designing the look to match your style. While Grid is a popular feed template for standard Instagram posts, the Waterfall theme works better for Reels because of the longer format. You don’t have to take our word for it though. Scroll through the many templates and explore which one is right for you.
Then choose icon, text, background, and border colors or leave things simple with black and white. The point is, explore the options and have fun. Tweak and tailor the look just the way you want it.

You might also want to remove the captions altogether, or update the setting for the max text lines if you don’t want the captions to be super long on your site.
Step 6. Embed the code in your website
Once you have the look the way you want, it’s time to copy the embed code and paste it where you want it to go. Simply click on the “Get code” button.
To embed Instagram Reels in a WordPress website, create a widget in the Appearances section of your WordPress dashboard. You can add the widget in your footer, blog sidebar, or other location. Then paste the HTML code in the widget’s text box. You can also use Curator’s WordPress plugin, which allows you to paste short code instead of HTML.
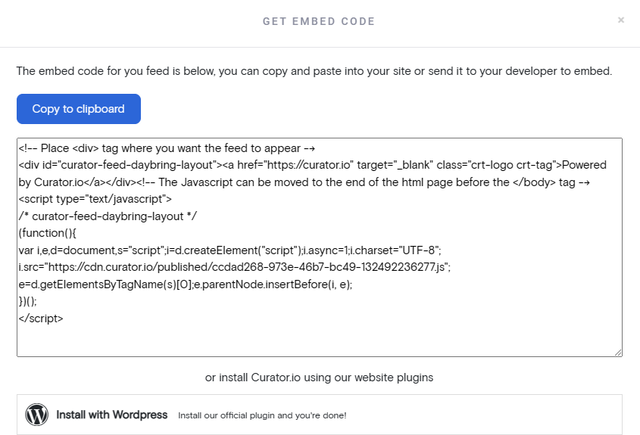
If you’re not using WordPress, all you need to do is create a custom HTML box where you want the feed to appear and paste the HTML code in there.
If you want to embed Instagram posts, check out this tutorial. The steps are similar, but you’ll choose a different type of Instagram content (a standard account instead of Reels).
Step 7. Periodically moderate new content
Even with an automatically updating feed, it’s important to review your embedded Instagram Reels from time to time. This helps ensure the content remains fresh, relevant, and aligned with your brand.
Consider:
- Removing outdated or off-brand Reels
- Highlighting timely or seasonal content
- Updating styling to match any changes to your website design
- Reviewing hashtag or mention-based sources to filter unrelated posts
A little ongoing maintenance goes a long way in keeping your Reel feed engaging and professional.
How to manually add specific Instagram Reels to your website
If you’re feeling like you just want to embed something specific, here is the manual method.
The benefits of this method
- Free no matter what (even for high website volume) – Social media aggregators are free or paid depending on your website traffic and the features you need. But this method is free no matter what.
- Works well if you only want to add specific posts – This method can work fine if you only want to add a handful of Reels to your website. But if you want to add new Reels regularly, it will be worth it to pay for an aggregator tool.
Despite these benefits, this method isn’t a fit for most website owners, because it requires custom coding to make sure the Reels look good on your site.
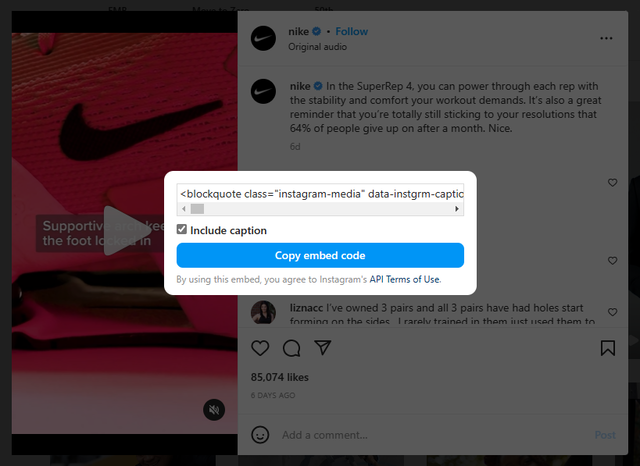
Step 1. Choose a Reel you want to add to your site
Head over to Instagram and find the first Reel video that you want to embed. Click on the three little dots in the right-hand corner. Then select “Embed” and choose whether or not you want the caption included.
Step 2. Copy and paste the embed code from Instagram
Copy the embed code.
Paste it in your website where you want it to appear, whether that’s your website footer, a blog sidebar, or a specific blog post or page on your website.
Step 3. Repeat for the other Reels you want to add
Repeat these steps for every Reel post that you want to add.
Copy and paste each one in order so that they appear in the order you want.
Step 4. Check the design and update as needed
The downside with this method is that you don’t get the easy aggregator design tools. You’ll need to use custom coding to stylize the feed.
If you don’t include captions however, the Reels might look great without any coding required.
Top free tools for embedding Instagram Reels
To help you embed your Instagram your Instagram Reels in an attractive, automatically updated feed, you need the right software.
All of these tools support Instagram Reels, so take a look and choose your favorite.
1. Curator.io

Curator is a popular social media aggregator for businesses of all sizes. You can use the free plan or choose a subscription that meets your needs. In addition to content support for Instagram, Curator also works with Facebook, Twitter, YouTube, TikTok, Slack, RSS feeds, Behance, and a dozen other platforms so you can publish your favorite content on your website.
Curator also offers dozens of themes and design options so you can stylize your feed easily.
Pricing:
The free plan allows up to 3 feeds or sources and up to 2,000 monthly site views. Curator’s free plan offers the least noticeable branding of any aggregator. (Just a small “Powered by Curator” link is added to the bottom of your feed.) Or, you can choose a paid plan to remove that branding. The Professional plan costs $25 per month and allows up to 15,000 monthly site views.
2. Walls.io

Walls.io is another option for adding Instagram Reels to your site automatically. It will keep your latest posts on your website so you don’t have to copy them manually. It works for Instagram Reels and standard posts.
Pricing:
Walls.io has a free plan that works with Instagram, but the downside is that if you want to upgrade to remove their branding from your website, you’re going to pay a heavy fee. Their lowest monthly subscription is $275 per month and allows you to upload your logo to your feed.
3. Flockler

With Flockler, you can embed a variety of social media content on your website. You can also create shoppable UGC galleries to make it easier for customers to shop the looks shared on your site.
Pricing:
Flockler doesn’t offer a free plan, but they do have a 14-day free trial. Their lowest cost plan is the Lite plan, which is $47 per month. This gives you 2 different sources.
4. EmbedSocial

EmbedSocial is a flexible social media aggregator that supports Instagram Reels as well as content from Facebook, TikTok, YouTube, and other platforms. It offers branded, mobile-responsive feed widgets that automatically update as you publish new content.
You can customize the look and layout of your feed, and use moderation tools to control what appears on your site. EmbedSocial also includes advanced features for managing user-generated content and collecting social reviews.
Pricing:
EmbedSocial offers a free plan that supports one feed with limited views. Paid plans start at $29 per month and unlock more customization, additional sources, and higher traffic limits. Access to UGC rights management and social reviews tools requires a Premium or separate plan, starting at $99 per month.
5. Juicer.io

Juicer is a straightforward social media aggregator that supports Instagram Reels. You can build a dynamic feed using posts from your own accounts, branded hashtags, or customer mentions. It’s a solid option for users who want a simple, affordable way to display social content.
Pricing:
Juicer offers a free plan with support for 2 content sources, though some Juicer branding will appear in your feed. The popular Starter plan costs $25 per month and includes up to 5 sources, plus call-to-action buttons. Additional sources can be added for around $5 each.
Adding a continuously updated feed of Instagram Reels is super simple when you follow these steps!
Ready to embed Instagram Reels on your site? Try our free forever feed.